Drop InfluxDB 1.x measurements with a Python script

I configured my Home Assistant influxdb integration to log absolutely everything, but my InfluxDB database grew out of control.
After setting up proper filtering for the entities I really needed, I had to manually delete (drop) all the unwanted measurements.

First, I dumped all the measurements in a text file :

influx -database ha -username admin -execute "show measurements"

With the influx command line tool and a bit of bash scripting, I was able to send a InfluxQL command DROP MEASUREMENT, but often some measurement were not dropped (still displayed with « SHOW MEASUREMENTS », and sometimes still had some records.

This is a known issue and it won’t probably be fixed in versions 1.x.

Finally, I ended up writing a ‘quick and dirty » python script to drop the measurements listed in a text file.
It performs the following steps:

  • Reads the measurement to drop, line by line, from a text file
  • Issues a SHOW MEASUREMENT query, and iterates through the results until a match is found
  • Tries to display the count of points found
  • Executes the DROP MEASUREMENT query
  • Attemps to to display the points count again  (but I never saw this happening) or, if the measurement is not found, considers it was successfully dropped

Ensure you have installed the influxdb pip package :

pip install influxdb

Here is the script :

import time
from influxdb import InfluxDBClient
client = InfluxDBClient('nas', 8086, 'admin', '', 'ha') 
file = open("//nas/data/ms-2025-01-04-delete.txt")
for line in file :
    ligne = line.strip()
    print()
    print("%s : " % ligne, end="")
    measurements = client.get_list_measurements()
    for measurement in measurements :
        if ligne == measurement['name'] :
            print("found, ", end="")
            result = client.query('select count(value) from "' + ligne + '";')
            try:
                print("count before: %d, " % result.raw['series'][0]['values'][0][1], end="")
            except Exception :
                print("N/A, ", end="")
            client.drop_measurement(ligne)
            result = client.query('select count(value) from "' + ligne + '";')
            try:
                count_after = result.raw['series'][0]['values'][0][1]
                print("count after: %d" % count_after, end="")
            except Exception :
                print("drop OK (not found)", end="")
file.close()
Theengs Gateway on LibreElec

I wanted HomeAssistant to use my Body Mi Scale with Home Assistant, but my server is too far from the scale and can’t detect the bluetooth data.

But I do have a Raspberry running LibreElec (in a beautiful Flirc case) near my bathroom, and I decided to use it as a bluetooth proxy. LibreElec being a « Just Enough OS », I didn’t want to mess with it, as my config should survive version upgrades.
Fortunately, LibreElec supports Docker, and a Docker image exists

Here are my quick notes :

LibreElec

Use a recent version of LibreElec (12.x in my case)

Make sure bluetooth is enable in Kodi / Settings / LibreElec / Services

Make sure the Docker addon for Kodi is installed

SSH in LibreElec as root

Pull the docker image :

# docker pull theengs/gateway

And run it with the following settings :

# docker run --restart always --network host -e MQTT_HOST=mqtt_broker_hostname -e BLE=true -e DISCOVERY=true -e SCANNING_MODE=active -e PUBLISH_ALL=false -e SCAN_TIME=1 -e TIME_BETWEEN=20 -v /var/run/dbus:/var/run/dbus --name TheengsGateway theengs/gateway

Each time you use your scale, you should see appear after ~10 secs some data into the home/TheengsGateway/BTtoMQTT topic

Optional : use passive scanning

Because passive scanning is soooo much cool than active (I guess that’s a good enough reason), you can enable it with a few extra steps.

First, enable experimental features in bluez :

# systemctl edit bluetooth.service

and add the following lines :

[Service]
ExecStart=
ExecStart=/usr/lib/bluetooth/bluetoothd --experimental $BLUEZ_ARGS $BLUEZ_DEBUG

Then restart bluetooth

# systemctl restart bluetooth

And replace the docker command with

# docker run --restart always --network host -e MQTT_HOST=mqtt_broker_hostname -e BLE=true -e DISCOVERY=true -e SCANNING_MODE=passive -e PUBLISH_ALL=false -v /var/run/dbus:/var/run/dbus --name TheengsGateway theengs/gateway

Note : upon reboot, because the container starts before the Wifi is up, using a hostname for the MQTT broker resulted in a connection failure and the container being stucked. I opened an issue on github. To work around this issue, i simply used the IP address for the MQTT broker instead.

HomeAssistant

If MQTT Integration is installed in Home Assistant, it should discover the scale and its sensors.
You can now install the bodymyscale integration.


Kopia Backup memo

My quick notes about configuring Kopia on several Debian, to a single repository :

Installation

# curl -s https://kopia.io/signing-key | sudo gpg --dearmor -o /etc/apt/keyrings/kopia-keyring.gpg
# echo "deb [signed-by=/etc/apt/keyrings/kopia-keyring.gpg] http://packages.kopia.io/apt/ stable main" | sudo tee /etc/apt/sources.list.d/kopia.list
# apt update
# apt install kopia

Systemd service

Create /etc/systemd/system/kopia.service :

[Unit]
Description=Kopia Server
Wants=network-online.target
After=syslog.target time-sync.target network.target network-online.target

[Service]
Environment="HOME=/root"
Type=simple
RemainAfterExit=yes
ExecStart=/usr/bin/kopia server start --insecure --without-password --log-dir=/var/log/kopia
ExecStop=/usr/bin/kopia server shutdown

[Install]
WantedBy=multi-user.target

Reload and enable :

# systemctl daemon-reload
# systemctl enable kopia

Init file (alternative to systemd)

In case you don’t use Systemd (inside a chroot for exemple), create /etc/init.d/kopia :

#! /bin/sh
### BEGIN INIT INFO
# Provides: kopia
# Required-Start: $syslog $time $remote_fs
# Required-Stop: $syslog $time $remote_fs
# Default-Start: 2 3 4 5
# Default-Stop: 0 1 6
# Short-Description: Deferred execution scheduler
# Description: Debian init script for kopia
### END INIT INFO

PATH=/bin:/usr/bin:/sbin:/usr/sbin
DAEMON=/usr/bin/kopia
PIDFILE=/var/run/kopia.pid
test -x $DAEMON || exit 0

. /lib/lsb/init-functions

case "$1" in
start)
log_daemon_msg "Starting kopia" "kopia"
start-stop-daemon --start --make-pidfile --pidfile $PIDFILE -b --exec /usr/bin/kopia server start -- --config-file=/root/.config/kopia/repository.config --insecure --address http://0.0.0.0:51515 --without-password --log-dir=/var/log/kopia
log_end_msg $?
;;
stop)
log_daemon_msg "Stopping kopia" "kopia"
killproc -p $PIDFILE $DAEMON
log_end_msg $?
;;
force-reload|restart)
$0 stop
$0 start
;;
status)
status_of_proc -p $PIDFILE $DAEMON kopia && exit 0 || exit $?
;;
*)
echo "Usage: /etc/init.d/kopia {start|stop|restart|force-reload|status}"
exit 1
;;
esac

exit 0

Repository

Export repository configuration from an existing installation :

# kopia repository status -t -s

Import repo configuration on the newly installed server :

# kopia repository connect from-config --token ..........
# service kopia restart

Initial configuration

Setup a different « default » snapshot time on this host :

# kopia policy set --snapshot-time="04:00" @hostname
# kopia server refresh

Email reporting

Create an email reporting profile :

# kopia notification profile configure email \
--profile-name=email \
--smtp-server=mysmtpserver \
--smtp-port=25 \
--mail-from=user@domain.tld \
--mail-to=user@domain.tld \
--format=html

Send test email :

# kopia notification profile test mail

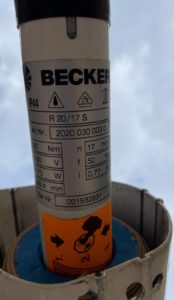
Réglage des fins de course sur moteur Becker R20/17S

Voici comment effacer et régler les fins de cours sur un moteur pour store banne Becker R20/17S

Ce moteur était produit au début des années 2000, et semble disposer de vis de réglage, mais qui n’ont aucune action (confirmé lors du démontage du moteur).

Les documentations et informations sont assez rares. Attention, les moteurs sans la référence « S » (pour solaire) sont destinés aux volets roulants. Il n’ont pas de problématique de réglage de la position basse puisque le moteur détectera l’arrêt du volet, ce qui n’est pas le cas avec un store banne.

Les documentations Becker recommandent l’utilisation d’un boitier de programmation spécifique vendu par leurs soins, dont je ne dispose pas.

La reprogrammation se fait en connectant simultanément les 2 fils noir et marron du moteur, comme pour demander au moteur à la fois de descendre et monter. Il faut ensuite envoyer une commande d’alimentation, le moteur doit confirmer en émettant 1 ou 2 claquements. Une fois le réglage terminé, il faut déconnecter les 2 fils.

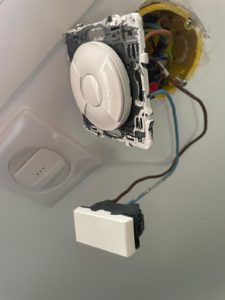
Afin de réaliser les opérations plus facilement, je recommander de placer un simple interrupteur entre les bornes des fils noir et marron, directement sur l’interrupteur de commande du store :

La couleur des fils ne correspond évidemment pas sur la photo.

Effacement des fins de course

Pour effacer les fins de course (par exemple pour dérouler entièrement la toile afin de la démonter), il faut réaliser l’opération ci-dessus pour entendre les 2 claquements.

Programmation des fins de course

  • Rentrer complétement le store jusqu’à le moteur s’arrête seul
  • Effacer les fins de course
  • Descendre le store jusqu’à la position voulue
  • Connecter les fils noir et marron et appuyer sur une commande, pour entendre un seul claquement. La position basse est mémorisée
  • Déconnecter les fils noir et marron
  • Rentrer le store


Dreame H12 Pro – Erreur « réservoir d’eau sale plein »

Le Dreame H12 Pro (et probablement des modèles similaires tels que le H11) peut présenter un message d’erreur « Réservoir d’eau salle plein – Veuillez vider le réservoir d’eau sale », alors que celui-ci n’est pas plein.

Voyant réservoir d'eau salle

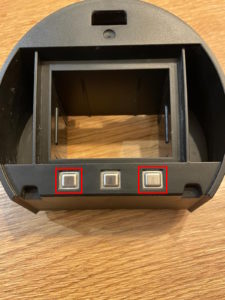
La manipulation indiquée dans le mode d’emploi ne résout pas le problème :

L’explication dans mon cas était différente : le couvercle de ce réservoir possède 2 électrodes qui plongent dans le réservoir et permettent de détecter quand le niveau d’eau est élevé.
Même le réservoir vide, je mesurais avec mon multimètre une résistance de 3 Megohms entre les 2 bornes à gauche et à droite du couvercle. Un séchage en règle du couvercle ne changeait rien.


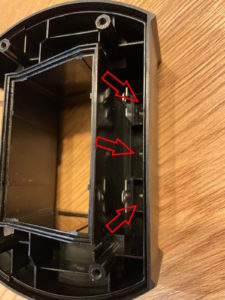
Finalement, en retirant les 4 vis du couvercle, j’ai pu ouvrir ce dernier et constater que de l’eau était présente à l’intérieur du couvercle, et que du courant arrivait à passer entre les bornes de contact (confirmé en déconnectant les cosses).
J’ai alors séché l’intérieur en m’aidant d’un sèche-cheveux, notamment sous les bornes de contact:


Le multimètre indiquait ensuite une résistance infinie entre les 2 bornes.
Il a ensuite suffit de remonter l’intégralité, en faisant attention à ne pas pincer les fils en refermant.

Le problème était réglé et j’ai pu utiliser l’appareil.

Attention : cette manipulation peut annuler votre garantie, à réaliser à vos risques et périls.

Il y a manifestement un défaut d’étanchéité du couvercle qui fait que l’humidité se répand si le réservoir n’est pas bien vidé, ou si l’appareil est renversé.

English version :

The Dreame H12 Pro (and probably similar models such as the H11) may display an error message « Dirty water tank full – Please empty the dirty water tank » even when it is not full.

The procedure outlined in the user manual (cleaning the tube and the dirt sensors) does not solve the problem.

In my case, the explanation was different: the lid of this tank has 2 electrodes that dip into the tank and allow detection when the water level is high. Even with the tank empty, I measured a resistance of 3 Megohms between the 2 terminals on the left and right of the lid using my multimeter. Properly drying the lid did not change anything.

Finally, by removing the 4 screws from the lid, I was able to open it and see that there was water inside the lid, and that current was able to pass between the contact terminals (confirmed by disconnecting the terminals). I then dried the interior using a hairdryer, especially under the contact terminals.

The multimeter then indicated infinite resistance between the 2 terminals. It was then sufficient to reassemble everything, being careful not to pinch the wires when closing.

The problem was solved and I was able to use the device.

Caution: This manipulation may void your warranty, perform at your own risk.

There is evidently a sealing defect in the lid causing moisture to spread if the tank is not properly emptied, or if the device is overturned.

Delete values from influxdb

Quick (and dirty) tip and script to remove unwanted or incorrect values from influxdb.
Precisely, this one removes all values above 50 fromArkteosreg3_exterieur_temp.

#!/bin/sh
influx -database 'openhab3_db' -host 'localhost' -port '8086' -username 'admin' -password '' -execute 'select * from Arkteosreg3_exterieur_temp where value > 50' | awk '{print $1;}' > /tmp/time.txt
while read -r line; do echo "$line";influx -database 'openhab3_db' -host 'localhost' -port '8086' -username 'admin' -password '' -execute "delete from Arkteosreg3_exterieur_temp where time=$line"; done < /tmp/time.txt


m5Panel for OpenHAB

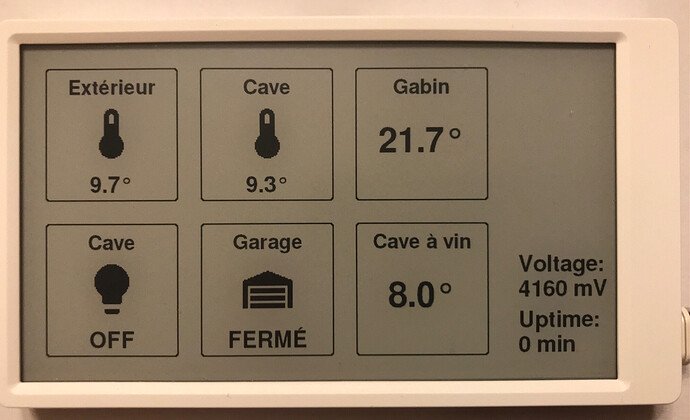
I’ve published some time ago a beta release of my OpenHAB panel using a m5paper

I want it to be as simple as possible : it queries OpenHAB items through REST API, so much of the configuration will be on the OpenHAB side. I don’t want « yet another interface to configure with its cryptic syntax ».

Actually, it just displays the 6 specified OpenHAB item’s Label and Status.

While the is no power optimizations, it can already run several hours on battery.

See more on github

Wemos D1 simple OLED display for OpenHAB

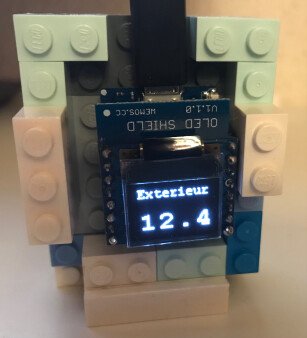
I managed to use an Wemos D1-mini and its OLED shield to create a mini-display for temperature, with (almost) no line of code.
Configuration is done once, and displayed information is entirely sent through MQTT.

Here’s a little tutorial:

  • Flash the D1 mini with Tasmota with tasmota-display.bin build
  • Perform the basic Tasmota setup (wifi, MQTT, …)
  • Connect the OLED shield on the D1 mini
  • Set the I2C pins :
    • Web interface / Configuration / Configure Module
    • D2 GPIO4 : I2C SDA
    • D1 GPIO5 : I2C SCL
  • Check the OLED shield is detected :
    22:11:45 CMD: i2cscan
    22:11:45 MQT: stat/esp01/RESULT = {"I2CScan":"Device(s) found at 0x3c"}
  • Configure the display settings through display commands :
    • DisplayModel 2 (SSD1306 ie OLED Shield)
    • DisplayWidth 64
    • DisplayHeight 48
    • DisplayMode 0
    • Optionally DisplayRotate 2 to display upside down
  • Finally, type use the Display command to check your display settings :
    {"Model":2,"Width":64,"Height":48,"Mode":0,"Dimmer":15,"Size":1,"Font":1,"Rotate":2,"Refresh":2,"Cols":[16,8],"Rows":2}}
  • Optionally “Configure timers” to turn display on/off on fixed times

The device is now ready to receive MQTT “display commands”.
I created the following rule :

rule "esp01publishtemp"
when
    Item HueSensor1Temperature received update
then
    val mqttActions = getActions("mqtt","mqtt:broker:mosquitto-nas")
    val esp01Temp = String.format("%2.1f",(newState as DecimalType).floatValue)
	logInfo("esp01.rules", "esp01publishtemp : newState=" + newState + " ,esp01Temp="+esp01Temp)
	mqttActions.publishMQTT("cmnd/esp01/displaytext","[Ozf1]Exterieur:[c1l2f2s2p-4]"+esp01Temp)
end

Explanations : When HueSensor1Temperature item is updated (no matter if it’s MQTT based or not) :

  • Format the payload with 1 decimal
  • Format the display :
    • [0zf1] : Turn the display on (0), clear it (z) and select font 1
    • Display the text for the first line (“Outside” in french here)
    • [c1l2f2s2p-4] : On column 1 (c1) and line 2 (l2), select font 2 (f2), scale factor 2 (s2) and pad 4 characters to the right (p-4)
    • Display the value
  • Send the MQTT payload to the moquitto-nas broker

At first, nothing will be displayed until the first MQTT update.

This page list all display possibilities with tasmota.

Enjoy !

Sonoff zigbee bridge with OpenHAB zigbee binding

This a copy of my post on the OpenHAB forums.

I wanted to start using zigbee at home, and I wanted it simple.

First, I bought Itead Sonoff Zigbee Bridge (SNZB or zbbridge) and flashed it with tasmota.
See https://notenoughtech.com/home-automation/flashing-tasmota-on-sonoff-zigbee-bridge or https://www.digiblur.com/2020/07/how-to-use-sonoff-zigbee-bridge-with.html (without soldering, but more HomeAssistant oriented).
It works fine, but I like items auto-discovery and don’t want to bother with magic-voodoo-json data extraction and formatting.
The article from digiblur shows native integration with HomeAssistant binding, and I’ve managed to achieve the same thing with OpenHAB.

So this is a litlle howto:

  • Read Digiblur’s article and strictly apply all steps, except the HA ones. The related video is also helpful.
    I uploaded the latest UART firmware (6.7.6), it seems you don’t have to stick to older 6.5.5 with OH
    A the end, you should be able to telnet to port 8888
  • Install socat, and bind your serial port to the zbbridge radio:
    socat -dd pty,link=/dev/ttyzbbridge,raw tcp:192.168.x.y:8888


    Of course, adjust the IP address to point the zbbridge one.

You can also specify owner and group with user-late and group-late to avoid permission issues :

socat -dd pty,link=/dev/ttyzbbridge,raw,user-late=openhab,group-late=dialout tcp:192.168.x.y:8888
  • Install serial binding in OH
    You must configure OH startup script to include `/dev/ttyzbbridge` as stated in the documentation
  • Install Zigbee binding in OH
  • Add a new Zigbee « Ember EM35x Coordinator » thing
    Just set the serial port to /dev/ttyzbbridge. I didn’t touch other settings since I was not sure of what they really do
  • Pair zigbee devices as stated on the zigbee binding documentation:
    Search for Zigbee things
    Put your device in pairing mode, it should appear.
    Wait for the discovery to finish (a name should appear, not « unknow zigbee device »
  • Enjoy !

I did this minutes ago, this is a basic procedure. I was able to pair Xiaomi plug, Aqara temp/hum and door sensors, and a Ikea Tradfri dimmer. Some of the devices don’t report battery status as zigbee2tasmota does.

  • There is room for a lot of enhancements, for example:
    Make socat a service with auto-reconnect
  • Fine-tune the zigbee coordinator settings

Finally, it would be great the the serial binding allows Serial-over-TCP connections as HA does with socket://<your bridge IP>:8888 as serial port path.

Lego Power Functions extension for mBlock 5

My son and I did wrote an mBlock 5 extension to control Lego Power Functions.

It is based on the Arduino library from https://github.com/jurriaan/Arduino-PowerFunctions. The whole Power Functions is not implemented, there are only 2 blocks:

  • Begin Lego Power Functions : Select the pin connected to the LED, and the receiver channel
  • Lego Power Function : Select the output (Blue or Red), and the desired action (in continuous mode)

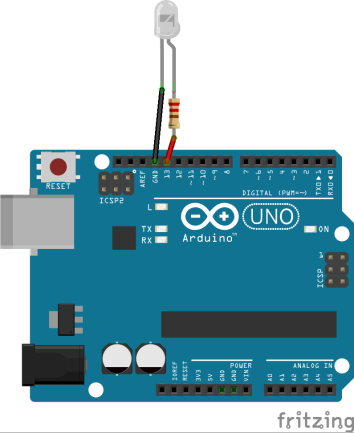
The setup is simple : Just connect an infrared LED and a 220 ohm resistor on a digital pin (13 by default).

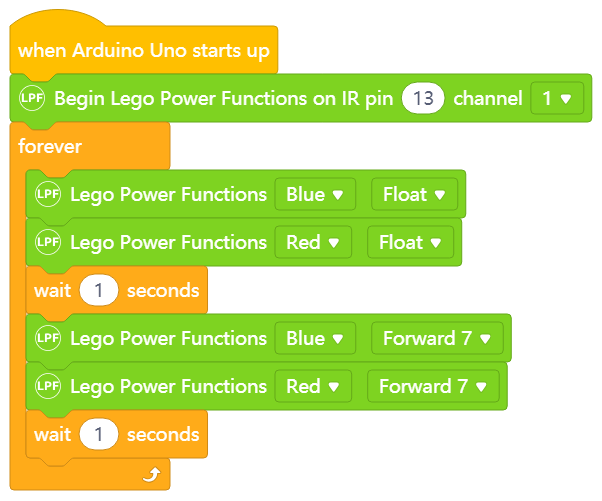
Sample code :

To use it in mblock 5:

  • Add an Arduino board
  • Click « + extensions » in the block section
  • Search « Lego Power Functions » in  Sprite Extensions

Note : if your arduino board is more recent than the extension, the extension will not appear in the search results. Select another board.

Translations are welcome !

For french readers

Mon fils et moi avons créé l’extension mBlock 5 pour Lego Power Functions.

Elle est basée sur la libraire Arduino suivante : https://github.com/jurriaan/Arduino-PowerFunctions. Toutes les fonctionnalités ne sont pas implémentées, il n’y a que 2 types de blocs :

  • Démarrer Lego Power Functions :Indiquer la broche connectée à la LED infrarouge, ainsi que le canal du récepteur
  • Lego Power Function : Choisir la prise (Blue or Red) et l’action (en mode continu)

Le montage est simple, il suffit de brancher une LED infrarouge et une résistance de 220 ohms en série sur une broche (D13 par défaut).

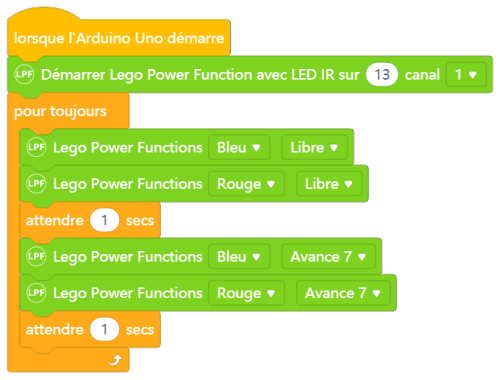
Exemple de code :

Pour l’utiliser dans mblock 5:

  • Ajouter une carte Arduino
  • Cliquer sur « + extension » dans la section des blocs
  • Chercher « Lego Power Functions » dans les extensions du lutin

L’extension n’apparaitra pas pour les cartes Arduino publiées après l’extension. Dans ce cas, il faut choisir une autre carte.

Les traductions dans d’autres langues sont les bienvenues !