Archives de catégorie : OpenHAB

Delete values from influxdb

Quick (and dirty) tip and script to remove unwanted or incorrect values from influxdb.
Precisely, this one removes all values above 50 fromArkteosreg3_exterieur_temp.

#!/bin/sh
influx -database 'openhab3_db' -host 'localhost' -port '8086' -username 'admin' -password '' -execute 'select * from Arkteosreg3_exterieur_temp where value > 50' | awk '{print $1;}' > /tmp/time.txt
while read -r line; do echo "$line";influx -database 'openhab3_db' -host 'localhost' -port '8086' -username 'admin' -password '' -execute "delete from Arkteosreg3_exterieur_temp where time=$line"; done < /tmp/time.txt


m5Panel for OpenHAB

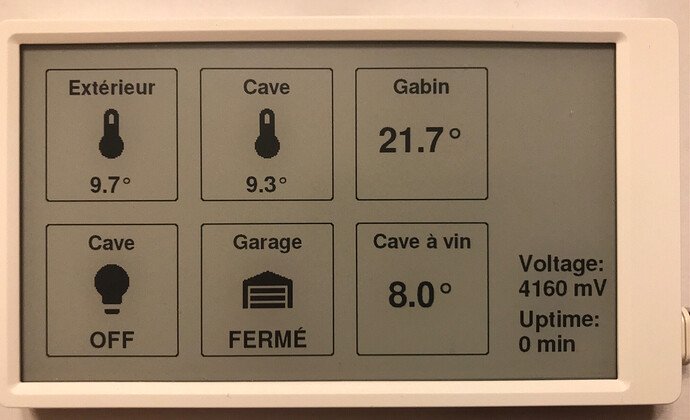
I’ve published some time ago a beta release of my OpenHAB panel using a m5paper

I want it to be as simple as possible : it queries OpenHAB items through REST API, so much of the configuration will be on the OpenHAB side. I don’t want « yet another interface to configure with its cryptic syntax ».

Actually, it just displays the 6 specified OpenHAB item’s Label and Status.

While the is no power optimizations, it can already run several hours on battery.

See more on github

Wemos D1 simple OLED display for OpenHAB

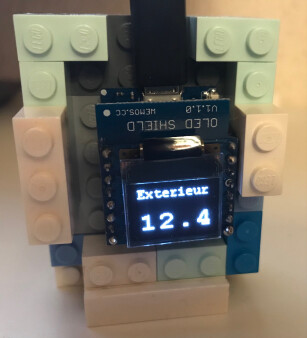
I managed to use an Wemos D1-mini and its OLED shield to create a mini-display for temperature, with (almost) no line of code.
Configuration is done once, and displayed information is entirely sent through MQTT.

Here’s a little tutorial:

  • Flash the D1 mini with Tasmota with tasmota-display.bin build
  • Perform the basic Tasmota setup (wifi, MQTT, …)
  • Connect the OLED shield on the D1 mini
  • Set the I2C pins :
    • Web interface / Configuration / Configure Module
    • D2 GPIO4 : I2C SDA
    • D1 GPIO5 : I2C SCL
  • Check the OLED shield is detected :
    22:11:45 CMD: i2cscan
    22:11:45 MQT: stat/esp01/RESULT = {"I2CScan":"Device(s) found at 0x3c"}
  • Configure the display settings through display commands :
    • DisplayModel 2 (SSD1306 ie OLED Shield)
    • DisplayWidth 64
    • DisplayHeight 48
    • DisplayMode 0
    • Optionally DisplayRotate 2 to display upside down
  • Finally, type use the Display command to check your display settings :
    {"Model":2,"Width":64,"Height":48,"Mode":0,"Dimmer":15,"Size":1,"Font":1,"Rotate":2,"Refresh":2,"Cols":[16,8],"Rows":2}}
  • Optionally “Configure timers” to turn display on/off on fixed times

The device is now ready to receive MQTT “display commands”.
I created the following rule :

rule "esp01publishtemp"
when
    Item HueSensor1Temperature received update
then
    val mqttActions = getActions("mqtt","mqtt:broker:mosquitto-nas")
    val esp01Temp = String.format("%2.1f",(newState as DecimalType).floatValue)
	logInfo("esp01.rules", "esp01publishtemp : newState=" + newState + " ,esp01Temp="+esp01Temp)
	mqttActions.publishMQTT("cmnd/esp01/displaytext","[Ozf1]Exterieur:[c1l2f2s2p-4]"+esp01Temp)
end

Explanations : When HueSensor1Temperature item is updated (no matter if it’s MQTT based or not) :

  • Format the payload with 1 decimal
  • Format the display :
    • [0zf1] : Turn the display on (0), clear it (z) and select font 1
    • Display the text for the first line (“Outside” in french here)
    • [c1l2f2s2p-4] : On column 1 (c1) and line 2 (l2), select font 2 (f2), scale factor 2 (s2) and pad 4 characters to the right (p-4)
    • Display the value
  • Send the MQTT payload to the moquitto-nas broker

At first, nothing will be displayed until the first MQTT update.

This page list all display possibilities with tasmota.

Enjoy !

Sonoff zigbee bridge with OpenHAB zigbee binding

This a copy of my post on the OpenHAB forums.

I wanted to start using zigbee at home, and I wanted it simple.

First, I bought Itead Sonoff Zigbee Bridge (SNZB or zbbridge) and flashed it with tasmota.
See https://notenoughtech.com/home-automation/flashing-tasmota-on-sonoff-zigbee-bridge or https://www.digiblur.com/2020/07/how-to-use-sonoff-zigbee-bridge-with.html (without soldering, but more HomeAssistant oriented).
It works fine, but I like items auto-discovery and don’t want to bother with magic-voodoo-json data extraction and formatting.
The article from digiblur shows native integration with HomeAssistant binding, and I’ve managed to achieve the same thing with OpenHAB.

So this is a litlle howto:

  • Read Digiblur’s article and strictly apply all steps, except the HA ones. The related video is also helpful.
    I uploaded the latest UART firmware (6.7.6), it seems you don’t have to stick to older 6.5.5 with OH
    A the end, you should be able to telnet to port 8888
  • Install socat, and bind your serial port to the zbbridge radio:
    socat -dd pty,link=/dev/ttyzbbridge,raw tcp:192.168.x.y:8888


    Of course, adjust the IP address to point the zbbridge one.

You can also specify owner and group with user-late and group-late to avoid permission issues :

socat -dd pty,link=/dev/ttyzbbridge,raw,user-late=openhab,group-late=dialout tcp:192.168.x.y:8888
  • Install serial binding in OH
    You must configure OH startup script to include `/dev/ttyzbbridge` as stated in the documentation
  • Install Zigbee binding in OH
  • Add a new Zigbee « Ember EM35x Coordinator » thing
    Just set the serial port to /dev/ttyzbbridge. I didn’t touch other settings since I was not sure of what they really do
  • Pair zigbee devices as stated on the zigbee binding documentation:
    Search for Zigbee things
    Put your device in pairing mode, it should appear.
    Wait for the discovery to finish (a name should appear, not « unknow zigbee device »
  • Enjoy !

I did this minutes ago, this is a basic procedure. I was able to pair Xiaomi plug, Aqara temp/hum and door sensors, and a Ikea Tradfri dimmer. Some of the devices don’t report battery status as zigbee2tasmota does.

  • There is room for a lot of enhancements, for example:
    Make socat a service with auto-reconnect
  • Fine-tune the zigbee coordinator settings

Finally, it would be great the the serial binding allows Serial-over-TCP connections as HA does with socket://<your bridge IP>:8888 as serial port path.