Wireshark remote sniffing without rpcapd

Wireshark for windows

After reading my article about rpcapd, Peter Calum sent me this message:

I can not use rcapd because of the problem with the random chosen port for the data transfer, because of the FW between our office network and our technical network servers. Our wireshark collecting host is placed here.

But after some work I found another solution which works real fine : Pipe a tcpdump command on the collecting host back trough SSH.
I use plink.exe which comes with PuTTY

Make a command file with the tcpdump command :

tcpdump -s0 -w - -i eth0 not port 22

Run

plink.exe -ssh -pw mypassword root@192.168.1.10 -m commands.txt | "c:program fileswiresharkwireshark.exe" -k -i –

when you send the command wireshark starts up and shows the data … voila

Wireshark for linux

And from linux, just run :

ssh root@192.168.5.228 "tcpdump -w - host 192.168.5.219" | wireshark -k -i -

AWStats byte order is not compatible

After migrating awstats data from debian i386 to debian amd64, awstat gives me the following error:

/usr/lib/cgi-bin/awstats.pl -config=awstats -update
Update for config "/etc/awstats/awstats.conf"
With data in log file "/var/log/apache2/access.log"...
Warning: Error while retrieving hashfile: Byte order is not compatible at 
../../lib/Storable.pm (autosplit into ../../lib/auto/Storable/_retrieve.al) 
line 331, at (eval 5) line 1

Explanation is here : hashes are not stored in the same way by Perl Storable on debian 32 bit and 64 bit.
The workaround is pretty simple: delete all hashes files, awstats will rebuild them

rm /var/lib/awstats/*.hash

Souris bluetooth et Debian

Voici comment faire en sorte qu’une souris bluetooth (en l’occurence une Logitech Laser Travel Mouse) soit reconnectée automatiquement au démarrage par ma Debian 5.

Ceci n’est qu’une adaptation des informations trouvées sur cette page

  • Ouvrir un terminal en tant que root
  • Installer le package bluez-utils
#apt-get install bluez-utils
  • Allumer la souris
  • Appuyer quelques secondes sur le bouton « Connect » de la souris, jusqu’à ce que le voyant clignote
  • Lancer la recherche de souris:
#hidd --search
Searching ...
  	Connecting to device 00:07:61:EA:91:63
  • La souris doit maintenant fonctionner
  • Editer le fichier /etc/default/bluetooth afin qu’il contienne les lignes suivantes (remplacer évidemment l’adresse mac par celle obtenue lors de la recherche) :
############ HIDD
#
# HID daemon
HIDD_ENABLED=1
HIDD_OPTIONS="--connect 00:07:61:EA:91:63 --master --server"
  • La souris doit maintenant être connectée dès qu’elle est allumée

Miniatures CRW Canon sous Windows

A cause des constructeurs photos incapables de s’entendre sur un format RAW, préférant conserver leur format au détriment des utilisateurs, des manipulations sont nécessaires pour avoir les miniatures des images raw dans l’explorateur windows.

Windows XP

Télécharger et installer Microsoft RAW Image Thumbnailer and Viewer for Windows XP chez Microsoft

Windows Vista

Télécharger et installer les Canon RAW Codecs
La version 1.2 supporte les fichiers CRW et CR2, supportant ainsi (entre autres) les EOS 30D, 300D et 400D.

La version 1.5 est disponible ici

Pour en savoir plus

Source: Canon RAW CR2 and CRW Thumbnail support in Vista, avec les liens pour les appareils Nikon, Pentax et Olympus.

Petite explication sur le format RAW

Pourquoi cette multitude de formats n’est pas favorable aux utilisateurs que nous sommes, sur le site formats-ouverts.org

Astuces Exim

Simuler le routage d’un mail :

exim -bt cyril@domain.com


Voir la file d’attente

exim -bp


Supprimer un mail donné:

exim -Mrm id_mail


Débloquer un mail donné:

exim -M id_mail


Utiliser un smarthost:

Certaines listes de spam (notamment spamhaus) considèrent les IP résidentielles comme source de spam, et blacklistent donc ces adresses IP : « This IP range has been identified by Spamhaus as not meeting our policy for IPs which should deliver ‘direct-to-mx’ mail to PBL users. »

La solution la plus simple consiste à renvoyer les mails à destination des domaines concernés vers le smtp du FAI, ce dernier n’étant pas (toujours) blacklisté

Ajouter dans exim4.conf, au début de la section « begin routers »

send_to_smarthost:
       driver = manualroute
       domains = gmail.com : netcourrier.com
       transport = remote_smtp
       route_list = * smtp.free.fr

Cacti simple oid

I used to play with cacti, creating my own scripts, data input methods, data sources, graphs items and then graphs, but it was long way to obtain a single graph.

A smarter way is to use « SNMP – Generic OID Template » that appeared in cacti.
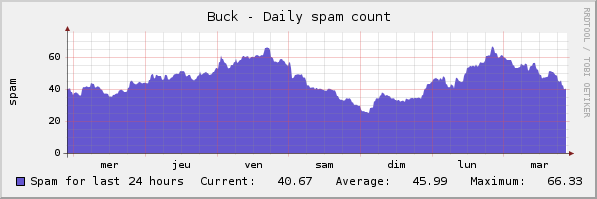
Let’s see an example : I want to graph the number of spams I’ve received during the last 24 hours. Counting is easy, I’ve just to find all files more recent than 24 hours in my IMAP folder « spam » (spamassassin does a very good job !). But I had to face security considerations, because apache user had to access my maildir !

It’s much simpler to expose this number via snmp, and then to create a simple graph based on Cacti « Generic OID » template. Note that SNMP is only accessible from my LAN, and the number of spams I’ve received is not very sensitive data. So let’s go:

  • Create the script /usr/local/bin/countspam.sh
#!/bin/sh
PATH=/usr/local/sbin:/usr/local/bin:/usr/sbin:/usr/bin:/sbin:/bin
find /home/cyril/Maildir/.SPAM/cur/ -ctime -1 | wc -l
  • Configure snmpd.conf to run this script and return the result
# Extensible sections.
exec .1.3.6.1.4.1.15555.1 countspam.sh /usr/local/bin/countspam.sh
  • Test the query. Note that the interesting value is .1.3.6.1.4.1.15555.101.1
root:/etc # snmpwalk -c public -v2c localhost .1.3.6.1.4.1.15555.1
SNMPv2-SMI::enterprises.15555.1.1.1 = INTEGER: 1
SNMPv2-SMI::enterprises.15555.1.2.1 = STRING: "countspam.sh"
SNMPv2-SMI::enterprises.15555.1.3.1 = STRING: "/usr/local/bin/countspam.sh"
SNMPv2-SMI::enterprises.15555.1.100.1 = INTEGER: 0
SNMPv2-SMI::enterprises.15555.1.101.1 = STRING: "40"
SNMPv2-SMI::enterprises.15555.1.102.1 = INTEGER: 0
SNMPv2-SMI::enterprises.15555.1.103.1 = ""
  • Connect to cacti console, click « New graph », select your host and « SNMP – Generic OID Template »
  • Enter the title, OID .1.3.6.1.4.1.15555.101.1 and choose a (fun) color
  • Your graph is now ready :

spam-count

Grub error 15 when adding new hard disk

I have a Asus M2N-MX motherboard, with an single SATA disk, and grub correctly configured:

/boot/grub/device.map
(hd0) /dev/sda

When I tried adding an IDE disk, grub refused to boot with « error 15 », which means « file not found ».

Obviously, grub was detecting disks in a wrong order, and was trying to load stage 1.5 from the IDE disk. To be clear, since the boot disk defined in the BIOS was the SATA, it had to be presented to grub as the first disk. So it’s a buggy BIOS.

This seems to be a common behavior when mixing IDE and SATA disks.
I googled about this error, but founded nothing really helpful. Changing boot order or activating onboard RAID didn’t solve this error.

Then I upgraded from bios 0701 to 0903, and the problem was gone.

TIP: To upgrade Asus motherboard bios on a linux-only computer, you don’t need to create a DOS bootable floppy. Recent Asus motherboard include a feature called « EZ-Flash », which is an BIOS upgrade utility included … in the BIOS.

  • Download BIOS update from Asus Website
  • Unzip it and extract the .ROM file (for me M2NX0907.ROM)
  • Rename this file with the motherboard model name (for me M2N-MX.ROM)
  • Install mtools on your distro
  • Insert a blank floppy
  • Format the floppy mformat a:
  • Copy the rom on the floppy mcopy M2N-MX.ROM a:
  • Reboot
  • During POST, press Alt-F2 to launch EZ-Update
  • The BIOS upgrade procedure will start

Récupération de photos avec photorec

Photorec est un utilitaire fonctionnant sous Linux et Windows qui est capable (entre autres) de scanner des cartes flash illisibles et de restaurer les fichiers qui y sont enregistrés.

Voici un bref tutoriel basé sur un cas réél : la batterie était vide et l’appareil photo s’est probablement éteint durant l’écriture sur la carte, la table des fichiers étant ainsi corrompue. La récupération a été effectuée sous Linux, pour plus de souplesse.

Windows ne veut plus de la carte (« Vous devez formater le disque avant de l’utiliser »)
Parfois linux accepte la carte sans broncher, ce n’est pas le cas cette fois-ci.

Sur une Debian ou Archlinux, il faut installer le paquet testdisk, qui comprend photorec.

Pour avoir l’erreur détaillée, il suffit de lancer la commande dmesg dans un terminal.

$ dmesg
sd 2:0:0:3: [sde] 512000 512-byte hardware sectors (262 MB)
sd 2:0:0:3: [sde] Write Protect is off
sd 2:0:0:3: [sde] Mode Sense: 43 00 00 08
sd 2:0:0:3: [sde] Assuming drive cache: write through
sd 2:0:0:3: [sde] 512000 512-byte hardware sectors (262 MB)
sd 2:0:0:3: [sde] Write Protect is off
sd 2:0:0:3: [sde] Mode Sense: 43 00 00 08
sd 2:0:0:3: [sde] Assuming drive cache: write through
sde: sde1
FAT: invalid media value (0x78)
VFS: Can't find a valid FAT filesystem on dev sde1.
FAT: invalid media value (0x78)
VFS: Can't find a valid FAT filesystem on dev sde1.

Premièrement, il est préférable de travailler sur une copie de la carte, que nous allons créer dans le répertoire « photorec »

$ mkdir photorec
$ cd photorec
$ cat /dev/sde > sde.img

On obtient donc un fichier sde.img de la taille de la carte flash.
On peut vérifier qu’il s’agit bien d’une image de disque :

$ file sde.img
sde.img: x86 boot sector

Il suffit ensuite de lancer photorec en lui indiquant le fichier image

$ photorec sde.img

  • Sélectionner le fichier sde.img
  • Choisir le type de partition intel
  • Sélectionner la partition
  • Choisir le système de fichiers Other (FAT)
  • Choisir « Free »
  • Taper Y pour enregistrer les images trouvées dans le répertoire en cours, dans le répertoire recup_dir.1

S’il manque des images, relancer l’opération en modifiant les options

  • Brute force: Yes
  • Whole disk

Une fois les images récupérées, le fichier .img peut être supprimé, et la carte formatée.

Astuce : Si des images jpeg semblent endommagées avec certains logiciels (comme Photoshop), essayer de les ouvrir avec Gimp.

Site officiel de photorec
Enabling Wake on Lan on DLink DFE-538TX

I’ve installed a D-Link DFE 538 TX network card (via rhine chipset) in my computer but wake on lan didn’t seem to work.
I discovered that I could (and I had) to enable it at each reboot, using ethtool

root@ale:~# ethtool eth1
Settings for eth1:
       Supported ports: [ TP MII ]
       Supported link modes:   10baseT/Half 10baseT/Full 
                               100baseT/Half 100baseT/Full 
       Supports auto-negotiation: Yes
       Advertised link modes:  10baseT/Half 10baseT/Full 
                               100baseT/Half 100baseT/Full 
       Advertised auto-negotiation: Yes
       Speed: 100Mb/s
       Duplex: Full
       Port: MII
       PHYAD: 8
       Transceiver: internal
       Auto-negotiation: on
       Supports Wake-on: pumbg
       Wake-on: d
       Current message level: 0x00000001 (1)
       Link detected: yes

According to ethtool’s man page :

      wol p|u|m|b|a|g|s|d...
             Set  Wake-on-LAN  options.  Not all devices support this.  
             The argument to this option is a string of characters specifying
             which options to enable.
             p  Wake on phy activity
             u  Wake on unicast messages
             m  Wake on multicast messages
             b  Wake on broadcast messages
             a  Wake on ARP
             g  Wake on MagicPacket(tm)
             s  Enable SecureOn(tm) password for MagicPacket(tm)
             d  Disable (wake on nothing).  This option clears all previous options.

So wake on lan is disabled each time I turn on my computer.
To enable all wake-on-lan options:

ethtool -s eth1 wol pumbg

And to enable them at each system startup :

echo "/usr/sbin/ethtool -s eth1 wol pumbg" | tee -a /etc/rc.local 

I can now use wakeonlan to wake up my computer… And it’s written in dmesg :

via-rhine: Woke system up. Reason: Magic packet.